

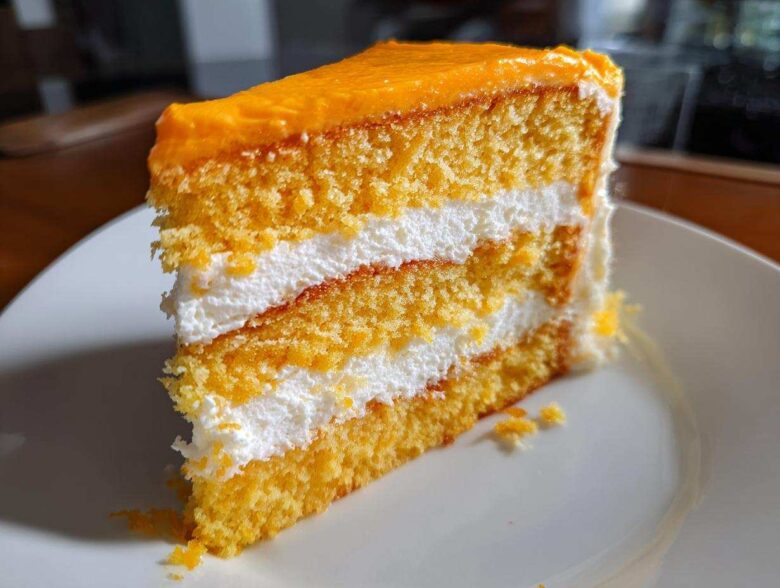
Oh my goodness, are you ready for a taste of pure summer nostalgia? Forget everything else you think you know about citrus cakes because this recipe changes the game. We are diving right into the Ultimate Moist Orange Creamsicle Cake, capturing that perfect, creamy, tangy vibe of the ice cream bar we all adored growing up. Seriously, this cake version? It wins every time.
My secret ingredient hiding in plain sight is buttermilk—it keeps the sponge unbelievably light and stops that inevitable dry cake situation that citrus recipes often fall into. Trust me, this Creamsicle Cake is the refreshing dessert you need right now. You can find out a bit more about my journey in the kitchen over here if you’re curious, but let’s get baking!
Why This Creamsicle Cake Recipe Delivers Nostalgic Flavor
Honestly, there are so many recipes out there, but most fall flat. They either taste too much like orange cleaner or they turn out dry five minutes after you frost them. Not this Creamsicle Cake! I spent ages tweaking this so it tastes exactly like that frozen treat but with that fluffy, just-right cake texture we all crave at parties.
Why does it always turn out so much better? We focus on the balance, not just slapping orange flavor on a basic vanilla cake. This recipe is designed to be superior when it comes to moisture and that creamy mouthfeel.
- Insane moisture levels that last for days.
- The bright, authentic flavor of real citrus.
- A frosting that holds its shape but melts perfectly on your tongue.
Key Elements of a Perfect Creamsicle Cake
If you skip two things, please don’t let it be the buttermilk and the fresh zest. The buttermilk does heavy lifting in keeping this a Moist Vanilla Orange Sponge. It reacts with the leavening agents and keeps everything tender. Then there’s the orange zest—you need that bright, aromatic oil only fresh zest provides. That’s where the real flavor pops!
Gathering Ingredients for Your Ultimate Creamsicle Cake
Alright, friend, now that you know this is going to be the Best Homemade Creamsicle Cake ever, preparation matters! For this beautiful Fluffy Orange Layer Cake to turn out perfectly, we need precision. Seriously, measure that flour twice, because we are aiming for bakery-style results here!
Cake Batter Components
For the actual cake layers, you’ll need your flour, sugar, baking powder, and salt ready to go in one bowl. Then, make sure you have 1 cup of softened butter, four lovely large eggs, and then your liquids: buttermilk, fresh orange juice, and enough vanilla extract to make things smell amazing. Don’t forget the orange zest—that’s non-negotiable for a vibrant cake!
Creamy Creamsicle Frosting Recipe Ingredients
For the frosting, we use the remaining softened butter paired with a whopping four cups of powdered sugar because we want this to be thick! You also need a touch more milk and orange juice, plus some vanilla. If you want that classic look, grab some orange food coloring, but honestly, the flavor is key! Always double-check that zest measurement against the cake requirements for that peak Bright Orange Zest Dessert flavor.
Step-by-Step Instructions for the Creamsicle Cake Layers
Okay, this is where the magic happens! Before you even grab a bowl, go ahead and preheat that oven to 350 degrees F (175 degrees C). Get two 9-inch cake pans greased up real good and a little flour dusted in there so they don’t stick—we want a clean release for our beautiful Creamsicle Cake layers!
We’re putting together a Retro Frozen Dessert Inspired Cake here, so we need to treat the cake batter right! It’s all about gentle mixing to keep that airy quality.
Mixing the Moist Vanilla Orange Sponge
First things first, whisk your dry goods—flour, sugar, baking powder, and salt—in your largest bowl. Next, you’re going to add that softened butter and mix it low and slow until it looks like coarse, sandy crumbs. This step is vital for that wonderful texture that makes this a Light and Fluffy Cake Recipe.
In another smaller bowl, quickly whisk your eggs, buttermilk, fresh orange juice, zest, and that vanilla. Now, slowly start adding the wet mix into the crumbly dry mix, keeping the mixer on medium speed until it just comes together. Stop mixing as soon as you don’t see streaks of flour anymore—overmixing is the enemy of fluffiness!
Baking and Cooling the Layers
Evenly divide that gorgeous batter between your two prepared pans. Pop them into the preheated oven, and set a timer for 30 to 35 minutes. After about 30 minutes, start checking with a toothpick right in the center. If it comes out clean, you’re golden!
Let them sit in the pans on a cooling rack for about 10 minutes. This lets them set up before you try to flip them out. Then, invert those layers onto the rack to cool completely. Seriously, do not try to frost them warm, or you’ll end up with a puddle of sad, melted Creamy Creamsicle Frosting Recipe!
Preparing the Creamy Creamsicle Frosting Recipe
Now we move onto the crowning glory: the frosting! If you want that true Creamsicle Cake experience, the frosting needs to taste just as bright and vanilla-y as the cake tastes orange. It’s really simple, but the order you add things totally changes the texture of this Creamy Creamsicle Frosting Recipe.
Start by taking your half-cup of softened butter and beating it until it’s just light and fluffy on its own. Then, here’s the trick: gradually start adding your four cups of powdered sugar. Don’t dump it all in at once, or you’ll have a sugar cloud explosion in your kitchen—I learned that the hard way!
Once the sugar is mostly incorporated, we add the liquids slowly: a little splash of milk and a splash of that fresh orange juice, along with the vanilla. Keep beating it until it’s perfectly smooth and spreadable for your Orange Creamsicle Dessert. If it looks too stiff, toss in just a tiny bit more milk until it feels right—you want it light, airy, and ready to smother that cake!
Assembling Your Party Ready Citrus Dessert
It’s time to bring this beauty together! Assuming your cake layers are totally cool—and I mean *cool*, not even the slightest bit warm—we can start building this showstopper Creamsicle Cake. First, place one layer down on your serving plate. Take about a third of your wonderful frosting and spread it evenly over the top. It should be thick enough that you can really see that layer peaking out!
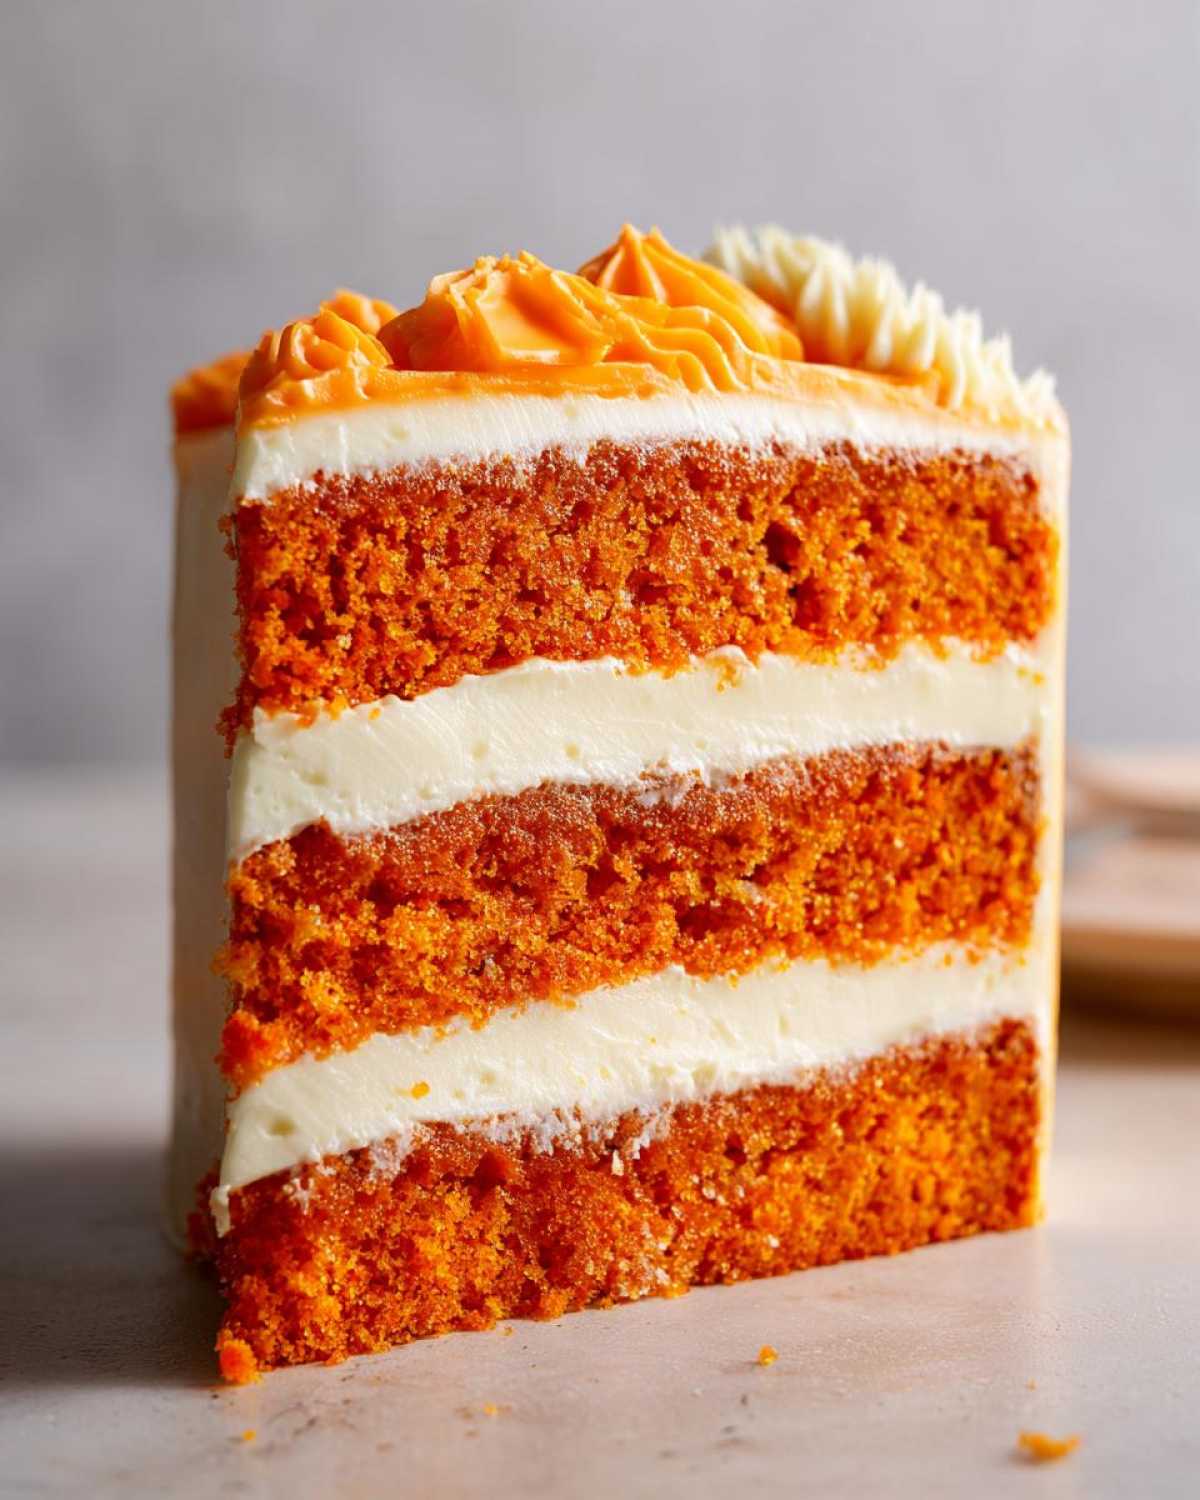
Carefully place your second layer right on top. Now, this is where my expert tip comes in: if your layers baked with a slight dome, grab a long serrated knife and gently level them off first. It makes frosting so much easier! Then, use the rest of that luscious topping to cover the top and sides completely. Try to get it as smooth as you can—it just makes the final look of your Party Ready Citrus Dessert so much cleaner!
Tips for Success with Your Creamsicle Cake
We’re so close to finishing this incredible Creamsicle Cake, so let’s run through a few quick pro tricks I’ve picked up over the years. I promise these little adjustments make the difference between a good cake and the absolute best Summer Orange Cake Ideas you’ve ever tried. Remember, baking is science, but treating it like a cozy chat makes it fun!
If your frosting ends up suspiciously thick—maybe you added a bit too much powdered sugar—don’t panic! Just beat in milk one teaspoon at a time until it softens up perfectly. Also, always remember that the flavor really deepens overnight. If you can stand it, let this cake rest covered in the fridge until the next day. You can read more about my general disclaimers before you try your hands at this recipe here!
Making an Easy Poke Cake Orange Flavor Variation
If you happen to have a 9×13 inch pan sitting around instead of two round ones, you can totally pivot this into an Easy Poke Cake Orange Flavor version! After the cake bakes and is still slightly warm, take a wooden spoon handle or a straw and poke holes all over the top—don’t be shy, get down close to the bottom!
While the cake is warm, mix up some orange gelatin according to the package directions, but maybe use one less cup of water than it calls for to make it set up firmer. Pour that warm gelatin mixture slowly over the warm poking cake. Then you just chill it until it’s totally firm before topping it with that dreamy frosting. It’s a super Refreshing Spring Dessert alternative!
Serving Suggestions for This Nostalgic Orange Vanilla Cake
When it comes to presenting this cake, remember we are going for that bright, happy feel—it’s just screaming summer! For a simple look, a dusting of extra powdered sugar over the top is elegant, or you can be extra fancy and garnish the edges with thin, curled ribbons of fresh orange zest. That really elevates it to a Bakery Style Creamsicle Dessert.
If you’re serving this as part of a big spread, it pairs fantastically with a very light accompaniment. Think about serving small bowls of fresh raspberries or perhaps a scoop of plain vanilla bean ice cream alongside each slice. It just lets the main orange and vanilla swirl shine! It’s perfect for any Family Favorite Orange Dessert occasion.
Storing and Reheating Your Homemade Creamsicle Cake
So, how do we keep this beautiful Creamsicle Cake tasting fresh? Because of all that amazing moisture and creamy frosting, these layers definitely need to chill out in the fridge. Store any leftovers tightly covered—a cake carrier works great, or just plastic wrap directly on the cut edges—and it should be fantastic for about four days.
Pro-tip from my kitchen: don’t serve it straight from the cold! Cake texture suffers when it’s icy. Pull your slices out about 30 minutes before you plan to eat them. Letting that butter in the cake and frosting warm up just a tiny bit brings back that incredibly soft crumb we worked so hard to create.
Frequently Asked Questions About Orange Dreamsicle Baking
I know you might have a few lingering questions before you dive into baking this beautiful Nostalgic Orange Vanilla Cake. It’s smart thinking! Getting the flavor and texture right is what separates a standard cake from something truly special. Here are some things people often ask me about making this the perfect Refreshing Spring Dessert.
Can I use bottled orange juice instead of fresh for the Creamsicle Cake?
Oh, you certainly *can*, but I really, really advise against it if you want that authentic flavor! Bottled juice is pasteurized, which kills off a lot of those bright, volatile oils that give you that zing. For a perfect Dessert with Orange and Vanilla Swirl, you just need to spend the extra minute or two zesting and juicing one or two good oranges. The difference in the final taste is night and day, I promise you!
How do I ensure my cake is a truly ‘No Fuss Creamsicle Treat’?
The key to keeping this a No Fuss Creamsicle Treat is simple: temperature management! If your butter is too cold, it won’t cream properly, and you’ll end up with lumps. If your eggs are ice cold, they can cause the batter to curdle when added to the creamed butter mixture. Take your butter and eggs out about an hour before you plan to start mixing. They should feel soft and room temperature—that’s it! That one step eliminates 90% of potential mixing hiccups.
If you have any further questions at all about substitutions or techniques, feel free to reach out to me via my contact page!
Estimated Nutritional Data for This Family Favorite Orange Dessert
Now, I know we are baking for joy and nostalgia here, not counting carbs, but people always ask! Based on standard ingredient weights, this slice of Family Favorite Orange Dessert clocks in around 420 calories. That’s for one generous slice, mind you!
You are looking at about 20 grams of fat and 55 grams of sugar per serving, but remember, that sugar is what makes it taste just like those creamsicles we love. This is just an estimate, of course, as exact figures depend on your specific brand of butter and the exact size of your orange juice measuring—you can read my full policy notes here. The important thing is that it’s absolutely delicious!
Share Your Best Homemade Creamsicle Cake Experience
Alright, baker friend, you’ve created pure sunshine in cake form! I truly hope this recipe makes your kitchen smell like the best summer day ever. Now it’s your turn—I absolutely live for hearing about how your cake turned out! Did you manage to get that perfect swirl of bright orange and creamy vanilla?
Please, please come back down to the comments below and give this recipe a rating! Five stars if it tasted exactly like your childhood dreams! Hearing what worked for you helps everyone else who tries this Creamsicle Cake succeed.
And if you took a picture of your beautiful creation—maybe you did the poke cake version or nailed that smooth side frosting—tag me on social media! I want to see your beautiful Orange Creamsicle Dessert on display. Happy baking, and enjoy every single glorious, creamy bite!
PrintUltimate Moist Orange Creamsicle Layer Cake

You will make a moist orange layer cake filled with vanilla cream and topped with a creamy orange frosting, capturing the classic creamsicle flavor.
- Prep Time: 25 min
- Cook Time: 35 min
- Total Time: 60 min
- Yield: 12 servings
- Category: Dessert
- Method: Baking
- Cuisine: American
- Diet: Vegetarian
Ingredients
- 2 1/2 cups all-purpose flour
- 1 1/2 cups granulated sugar
- 1 tablespoon baking powder
- 1/2 teaspoon salt
- 1 cup unsalted butter, softened
- 4 large eggs
- 1 cup buttermilk
- 1/2 cup fresh orange juice
- 1 tablespoon orange zest
- 1 teaspoon vanilla extract
- 1/2 cup milk (for frosting)
- 4 cups powdered sugar (for frosting)
- 1/2 cup unsalted butter, softened (for frosting)
- 1/4 cup fresh orange juice (for frosting)
- 1 teaspoon vanilla extract (for frosting)
- Orange food coloring (optional, for frosting)
Instructions
- Preheat your oven to 350 degrees F (175 degrees C). Grease and flour two 9-inch round cake pans.
- In a large bowl, whisk together the flour, sugar, baking powder, and salt.
- Add the softened butter to the dry ingredients and mix on low speed until the mixture resembles coarse crumbs.
- In a separate bowl, whisk together the eggs, buttermilk, orange juice, orange zest, and vanilla extract.
- Gradually add the wet ingredients to the dry ingredients, mixing on medium speed until just combined. Do not overmix.
- Divide the batter evenly between the prepared cake pans.
- Bake for 30 to 35 minutes, or until a toothpick inserted into the center comes out clean.
- Let the cakes cool in the pans for 10 minutes before inverting them onto a wire rack to cool completely.
- To make the frosting, beat the softened butter until creamy. Gradually add the powdered sugar, alternating with the milk and orange juice. Mix in the vanilla extract and food coloring if using. Beat until light and fluffy.
- Once the cakes are completely cool, place one layer on a serving plate. Spread a layer of frosting on top. Place the second layer on top.
- Frost the top and sides of the entire cake with the remaining creamsicle frosting.
Notes
- For a poke cake variation, bake the batter in a 9×13 inch pan. After cooling slightly, poke holes across the top and pour a mixture of orange gelatin over the warm cake before chilling. Frost after fully chilled.
- Use fresh orange zest and juice for the best bright flavor.
- If your frosting is too thick, add milk one teaspoon at a time until you reach a spreadable consistency.
Nutrition
- Serving Size: 1 slice
- Calories: 420
- Sugar: 55g
- Sodium: 250mg
- Fat: 20g
- Saturated Fat: 12g
- Unsaturated Fat: 8g
- Trans Fat: 0.5g
- Carbohydrates: 60g
- Fiber: 1g
- Protein: 4g
- Cholesterol: 85mg