

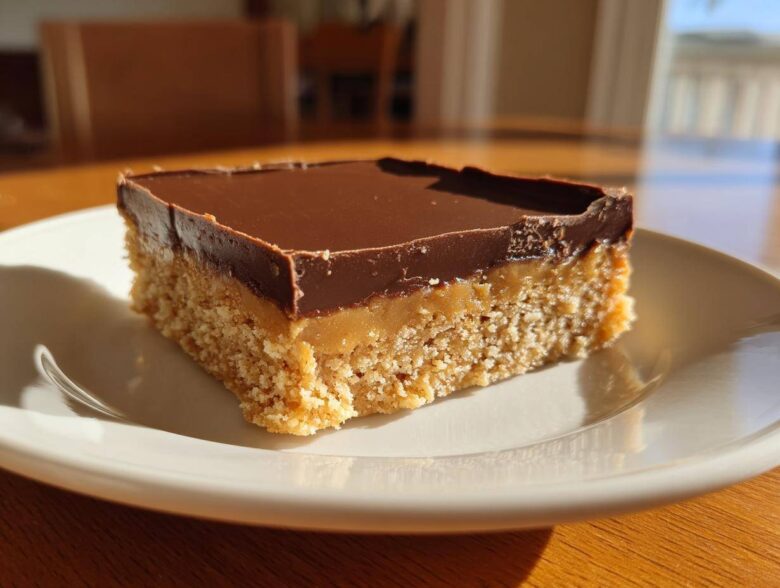
Oh, let me tell you about going back in time with just a fork! There are certain flavors that just instantly transport you back to the lunch line, right? For me, it’s always been those unbelievably decadent, layered peanut butter squares they served back in the day. Forget the fancy desserts; nothing beats the real deal, and I’m so thrilled to share my recipe for the authentic lunch lady peanut butter bars.
I spent way too many weekends tinkering in the kitchen perfecting this one. I’ve tried every variation out there—baking them, chilling them, using different toppings—but I finally cracked the code for that perfect balance of crumbly crust, creamy center, and thick, fudgy top layer. If you’re looking for that ultimate School Cafeteria Treat recreated at home, you’ve found it. Trust me, I know my nostalgic baking, and this recipe is the keeper you’ve been waiting for! You can read a little bit more about my journey perfecting these classics over on the About Us page.
Why You Will Love These Lunch Lady Peanut Butter Bars
Honestly, if you grew up eating school lunches, these bars are pure nostalgia bottled up in a square. They hit all the right notes without any fuss. I can’t imagine a better Potluck Dessert Bar to bring somewhere!
- They are seriously reminiscent of childhood! Every bite tastes exactly like those special cafeteria days.
- It’s an incredibly simple recipe, which is why I call it one of my favorite Easy No Bake Peanut Butter Desserts. No turning on the oven required!
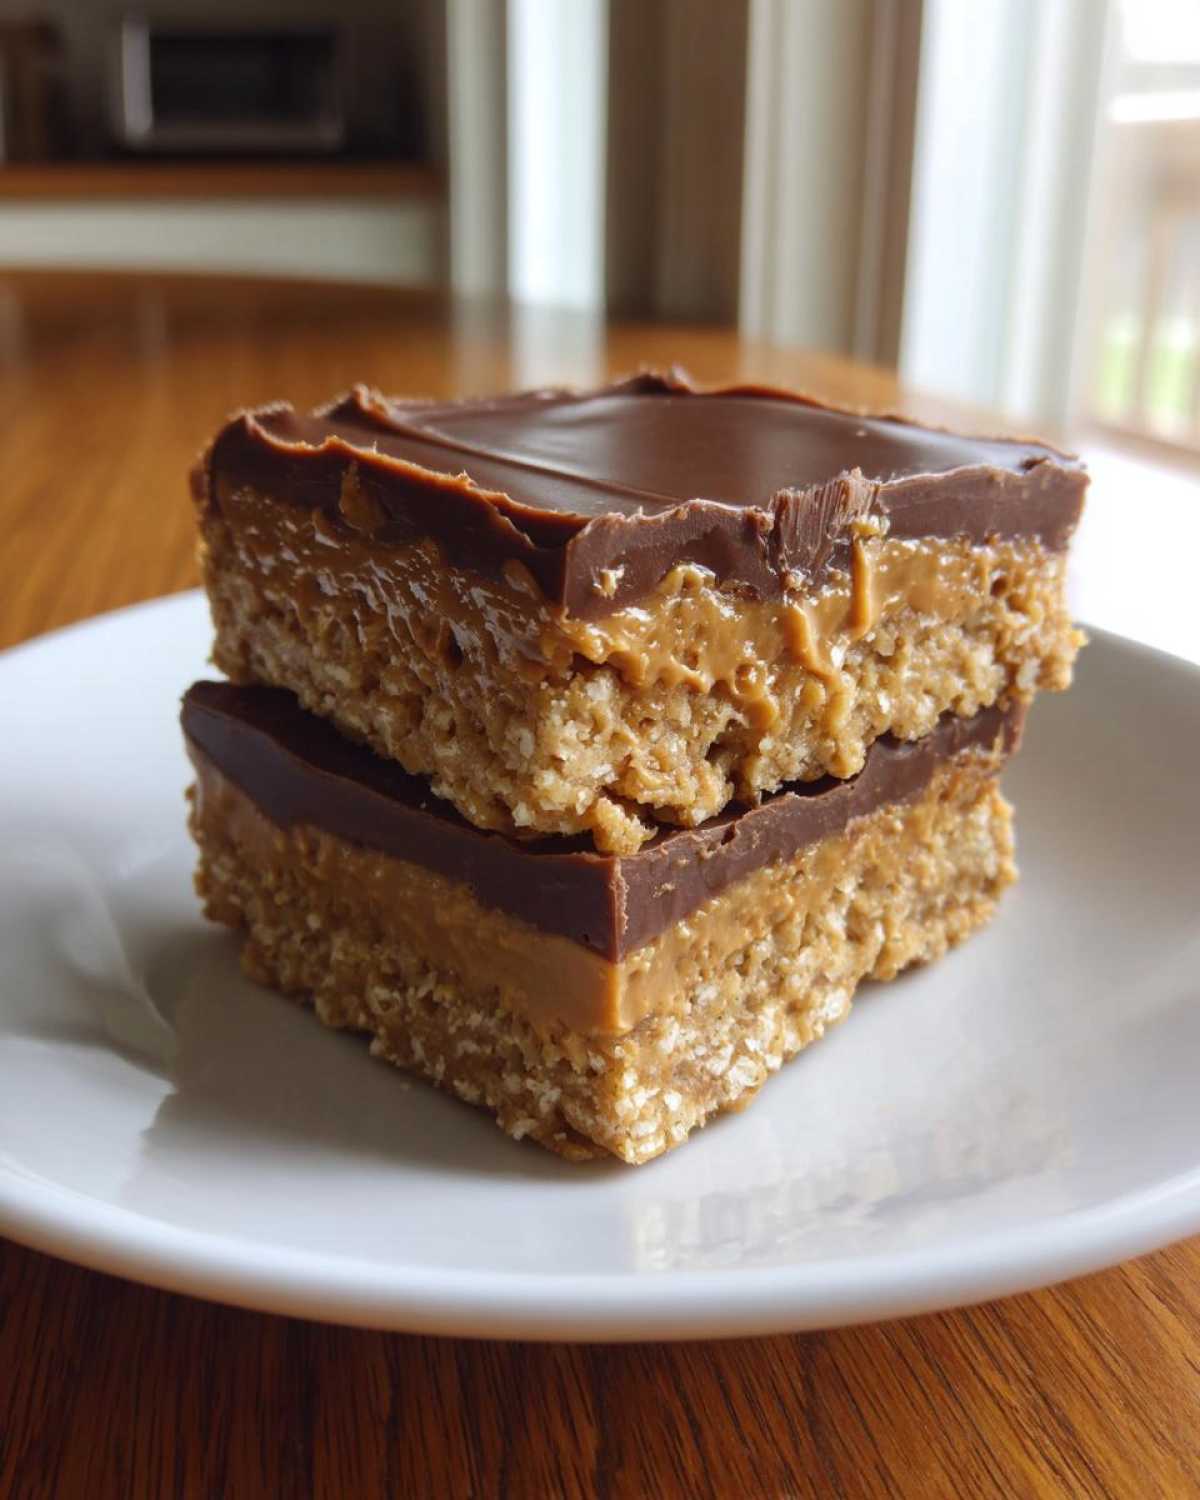
- The texture contrast is just perfect: a sturdy but slightly crumbly bottom, a melt-in-your-mouth middle, and a rich, fudgy top layer.
- These bars travel beautifully, making them an absolute must-have for potlucks, bake sales, or packing up for the kids.
- The ingredients are basic; you probably have everything you need in your pantry right now.
- They cut into perfect squares (thanks to the parchment paper trick!) for easy serving.
Forget complicated layers; these are straightforward, delicious, and you’ll be making batch after batch once you see how fast they come together.
Gathering Ingredients for Classic Lunch Lady Peanut Butter Bars
Okay, assembling the puzzle pieces for these bars is half the fun, and it’s surprisingly simple. Since these are a layered dream, we’re going to break down the list based on what goes where. You absolutely must use creamy peanut butter here—no crunchy allowed, we need that smooth sandwich texture for the middle layer!
For our base, grab one and a half cups of graham cracker crumbs, half a cup of rolled oats, and half a cup of melted unsalted butter. That’s for the foundation. For the star of the show—the filling—you’ll need that one cup of confectioners’ sugar, one full cup of creamy peanut butter, half a cup of softened unsalted butter, and just a splash of vanilla extract. Finally, the topping needs chocolate chips, a bit more creamy peanut butter, and just two tablespoons of milk to melt it all down into that beautiful, fudgy finish.
Keep your butter types clear: some needs to be fully melted for the crush, and the rest needs to be softened for creaming in the filling. It makes all the difference in achieving that traditional texture!
Step-by-Step Guide to Making Lunch Lady Peanut Butter Bars
Since these bars are the ultimate Easy No Bake Peanut Butter Desserts, the process is so satisfying because you see results fast—you just have to be patient while they chill! Everything starts with getting your baking pan ready. You absolutely need an 8×8 inch square pan, and do yourself a huge favor: line it with parchment paper first, leaving a couple of inches hanging over the sides. This overhang is your handle later, trust me!
Preparing the Graham Cracker Oat Crust
Time to mix up that base! In a medium bowl, just dump your graham cracker crumbs and the rolled oats together. Now, pour in that half cup of melted butter. You want to mix this until every crumb looks damp and fully coated. Once it’s ready, press this mixture down into your prepared 8×8 pan. I mean *press* it. Use the bottom of a measuring cup or just your fingers to make it nice and firm. A loose crust means a crumbly bar!
Creating the Creamy Peanut Butter Filling for Lunch Lady Peanut Butter Bars
Next up is the creamy layer—this is where the magic happens for the Best Peanut Butter Bar Recipe. In a separate bowl, you’re going to beat together your confectioners’ sugar, the full cup of creamy peanut butter, the softened half-cup of butter, and that teaspoon of vanilla. You need to mix this until it looks gloriously smooth, perfectly uniform, and utterly creamy. Spread this mixture carefully over the crust layer you just pressed in. Take your time smoothing it out so you don’t disturb that bottom layer one bit.
Melting and Spreading the Fudgy Chocolate Topping Bars
We’re finishing it off with the best part: the chocolate top! Put your chocolate chips, that final half-cup of peanut butter, and the milk into a microwave-safe bowl. This part needs attention: microwave it in short, powerful bursts—just 30 seconds at a time! Stir vigorously between each interval until it’s completely liquid and shiny. This careful melting ensures you get those gorgeous Fudgy Chocolate Topping Bars. Gently pour this chocolate blanket over the peanut butter filling and spread it all the way to the edges so there are no naked spots.
Chilling and Serving Your Childhood Favorite Desserts
Now comes the hardest part of any no-bake recipe: waiting! Pop that pan right into the refrigerator. You need a minimum of three hours for that chocolate topping to firm up completely. Once they are rock solid, grab those parchment paper handles you left hanging over the side and lift the whole thing out onto a cutting board. Use a sharp knife to cut them cleanly into squares. If you chill the knife first, you get even cleaner cuts!
Tips for Perfect Chewy Peanut Butter Squares
When you’re aiming for that perfect homemade version of a classic, sometimes you need a little finesse. These bars are supposed to be chewy, dense, and hold together beautifully, especially when you take them to a party. I’ve picked up a few tricks while perfecting this recipe that really help guarantee those ideal Chewy Peanut Butter Squares.
First, let’s talk about the base. The recipe states that you can skip baking the crust, and honestly, most days I do because it’s so fast! But if you want a truly sturdy, crisp bottom layer that won’t crumble when you bite into it, try this: bake that crust layer for about 8 minutes at 350°F. Just keep an eye on it so it doesn’t burn! You need to let it cool completely before moving on to the peanut butter layer, otherwise, you’ll just melt the filling right into the bottom.
Next, let’s discuss the chocolate topping thickness. The standard ratio is great, but if you’re feeling extra indulgent or if your kitchen is super warm, you might want a thicker topping. You can definitely increase that fudge layer! I suggest bumping the chocolate chips up to two full cups and adding just a tiny bit more milk—maybe three tablespoons total—to keep it spreadable. It adds such a wonderful richness to the top of these Chocolate Peanut Butter Layer Bars.
Another thing I always check is the temperature of my ingredients for that middle layer. Don’t rush the softening of the butter for the filling! If the butter is too cold, you’ll end up with clumps of sugar instead of smooth, creamy peanut butter goodness. Warm ingredients mix better and result in a filling that sets up evenly, avoiding that grainy texture that plagues so many homemade peanut butter desserts.
Variations on Lunch Lady Peanut Butter Bars
While I stand by the idea that the original version of these lunch lady peanut butter bars is perfect just the way it is—that smoky, sweet, salty trio is legendary—it’s also fun to jazz things up a bit now and then! These are such a staple in the world of Retro Dessert Recipes that they can handle a little playful updating without losing that homey feel.
The easiest place to make a change is right on top, in that gorgeous chocolate layer. Lately, I’ve been sprinkling just a tiny bit of flaky sea salt right onto the chocolate right after I pour it over the peanut butter filling. You have to do it immediately before it sets up, of course! That little hit of salt really makes the chocolate flavor pop and balances out the sweetness of the filling. It turns it into something that feels a little more gourmet, but still whispers, “I taste like the school cafeteria!”
Another variation that I dip my toe into sometimes is changing up the spread. Now, you know I preach creamy peanut butter for the classic texture, but if you happen to have, say, almond butter hanging around, you can swap a small portion of it in. Maybe replace half the peanut butter in the filling layer with almond butter. It changes the depth of flavor slightly, but since we’re holding onto the graham cracker base, the nostalgic shape is still there.
If you want to get extra creative with that base layer—and this stays firmly in the “fun variation” category—you can mix in half a cup of mini chocolate chips into your graham cracker/oat mix before pressing it down. You get little pockets of melted chocolate throughout the crust, which adds a lovely richness. Just remember, if you’re bringing these to an event, keep them cold, as those extra chocolate bits can get a little melty!
Storing and Reheating Your Homemade Lunch Lady Treats
Since these babies are completely no-bake, the storage game is actually super easy, which is another big win for these lunch lady treats in my book! Because they rely on butter and chocolate to set up rather than flour and baking, they thrive in the cold. You absolutely must keep these covered tightly in an airtight container.
If you’re just keeping them on your counter for a day or two, a good cover will do, but honestly, your refrigerator is their happy place. They stay much firmer, and the chocolate topping won’t get that awful soft, smeary texture if they get warm. I always aim to store leftover Simple Peanut Butter Cookies Bars in the fridge, and they last beautifully for about a week. I find the texture is actually best on day two or three once the flavors have really settled together.
Now, can you freeze them? Yes, you totally can! If you know you won’t get to them within a week, portion them out first. Cut them into squares, stack them with a small piece of parchment paper between each bar, and then place the whole stack into a freezer-safe bag or container. This prevents them from sticking together horribly once they freeze solid. They handle freezing like champs—just transfer them to the fridge overnight to thaw slowly, and they taste just as amazing as the day you made them!
Frequently Asked Questions About Lunch Lady Peanut Butter Bars
I always get so many questions when I post these, mostly because everyone has such strong memories attached to this flavor combo! I’ve put together the most common things folks ask about making these perfect lunch lady peanut butter bars at home. I hope this helps you get that ideal texture on your first try!
Is this recipe truly no-bake?
Yes, absolutely! That’s one of the best parts about these bars. The only heat involved is warming the chocolate for the topping, and even then, most people just use the microwave. The crust and the filling both set up beautifully just by chilling them in the fridge. They are a fantastic choice when you need Simple Dessert Recipes for Beginners or you just don’t want to heat up the kitchen!
Can I use natural peanut butter for the filling?
This is a big one, and here’s my honest take: I wouldn’t recommend it for the creamy filling layer. Natural peanut butter tends to be much runnier because the oil separates, and you need a really thick, stable filling to support that chocolate top. If you use natural peanut butter, you risk the whole middle layer becoming too soft and oozing out when you cut them. Stick to the standard, processed creamy peanut butter for the best set.
Can I substitute the graham cracker base in these Classic Peanut Butter Bars?
You can definitely experiment, but know that it will change the flavor ever so slightly! The classic recipe relies on the honey-graham flavor, but if you’re out, crushed vanilla wafer cookies work wonderfully as a swap. You can use the exact same amount—one and a half cups—and they give you a slightly sweeter, buttery bottom. Crushed shortbread cookies are another good candidate for these Classic Peanut Butter Bars!
What makes these different from other Simple Peanut Butter Cookies Bars?
The main difference is the structure! Most Simple Peanut Butter Cookies Bars are essentially a thick peanut butter cookie that gets baked, maybe with a chocolate drizzle. These lunch lady bars are purely layered construction: a dense, pressed crust, a separate, ultra-creamy, almost frosting-like middle layer made with powdered sugar and softened butter, and then that thick, fudgy topping. It’s the distinct texture of that middle layer that really screams “cafeteria” to me, not just a cookie dough base.
What is the best way to get clean cuts?
Clean cuts mean your bars look professional and aren’t messy at the potluck! First, make sure you chill them long enough—at least three hours, maybe even four if your fridge isn’t super cold. Second, use the parchment overhang to lift the whole slab out onto a cutting board. Third, and this is my little secret: warm your sharp knife under hot water, wipe it completely dry, and then slice. You’ll get a much cleaner edge, especially through that thick chocolate top. Wipe and reheat the knife between every couple of slices for perfect results!
If you need to read more about my general site policies, you can check out the Disclaimer page here.
Estimated Nutritional Data for Simple Dessert Recipes for Beginners
I always feel a little funny posting nutritional information because I’m a cook, not a scientist! Remember, these numbers are just my best estimates based on the standard ingredients listed above, and they are calculated per single square serving. If you’re bringing these amazing lunch lady peanut butter bars to a gathering, people will be too busy raving about the taste to worry about the macros, but I know some of you like to keep track!
This information is calculated assuming you cut the pan into 16 squares. These are definitely a treat, not a low-sugar snack, but totally worth every bite. For more details on how we use information across the site, please review our Privacy Policy!
- Serving Size: 1 square
- Calories: Approximately 280
- Fat: Around 18 grams (with about 7 grams being saturated fat)
- Carbohydrates: About 28 grams
- Sugar: Roughly 22 grams (as expected in a dessert this rich!)
- Protein: About 6 grams
- Sodium: Around 110 mg
This batch is fantastic because it yields a good amount, making it perfect for sharing, and it really stands up as one of the more satisfying Simple Dessert Recipes for Beginners you can master!
Share Your Experience with This Nostalgic Dessert
Well, we made it! You’ve got the blueprint for the absolute best, most authentic lunch lady peanut butter bars right here. Now comes the best part: tasting them! I truly hope that first bite brings back all those wonderful, chaotic, messy memories of school lunch days. It does for me every single time, and that’s why I keep sharing these Nostalgic Dessert Recipes.
I would absolutely love to know how they turned out for you! Did you manage to get those super clean cuts, or did yours end up looking a little more “rustic”? Please don’t be shy—head down to the comments section below and leave a rating. Five stars if they transported you straight back to the cafeteria, or maybe four if you had to sneak an extra bite before anyone else saw!
And if you share photos of your homemade squares on social media, tag me! Seeing these incredible Childhood Favorite Desserts recreated in your kitchen always makes my day. You can reach out directly to the site through the Contact page if you have specific questions I didn’t cover!
PrintClassic Nostalgic Lunch Lady Peanut Butter Bars
Make the familiar, layered peanut butter bars reminiscent of school cafeteria treats. This recipe features a simple base, a creamy peanut butter layer, and a fudgy chocolate topping.
- Prep Time: 20 min
- Cook Time: 0 min
- Total Time: 3 hr 20 min
- Yield: 16 squares
- Category: Dessert
- Method: No Bake
- Cuisine: American
- Diet: Vegetarian
Ingredients
- 1 1/2 cups graham cracker crumbs
- 1/2 cup rolled oats
- 1/2 cup (1 stick) unsalted butter, melted
- 1 cup confectioners’ sugar
- 1 cup creamy peanut butter
- 1/2 cup (1 stick) unsalted butter, softened
- 1 teaspoon vanilla extract
- 1 1/2 cups semi-sweet chocolate chips
- 1/2 cup creamy peanut butter
- 2 tablespoons milk
Instructions
- Line an 8×8 inch baking pan with parchment paper, leaving an overhang for easy removal.
- Combine graham cracker crumbs and oats in a medium bowl. Pour in the 1/2 cup melted butter and mix until fully combined. Press this mixture firmly into the bottom of the prepared pan.
- In a separate bowl, beat together 1 cup confectioners’ sugar, 1 cup peanut butter, 1/2 cup softened butter, and vanilla extract until smooth and creamy. Spread this peanut butter filling evenly over the crust.
- In a small microwave-safe bowl, combine the chocolate chips, 1/2 cup peanut butter, and milk. Microwave in 30-second intervals, stirring well after each, until the mixture is smooth.
- Pour the chocolate mixture over the peanut butter layer and spread evenly to cover.
- Refrigerate the bars for at least 3 hours, or until the chocolate topping is firm.
- Use the parchment paper overhang to lift the bars from the pan. Cut into squares before serving.
Notes
- For a slightly firmer base, you can bake the crust layer for 8 minutes at 350°F before cooling and adding the filling.
- If you prefer a thicker chocolate layer, increase the chocolate chips to 2 cups and the milk to 3 tablespoons.
- Store leftovers covered in the refrigerator.
Nutrition
- Serving Size: 1 square
- Calories: 280
- Sugar: 22
- Sodium: 110
- Fat: 18
- Saturated Fat: 7
- Unsaturated Fat: 11
- Trans Fat: 0
- Carbohydrates: 28
- Fiber: 1
- Protein: 6
- Cholesterol: 20