

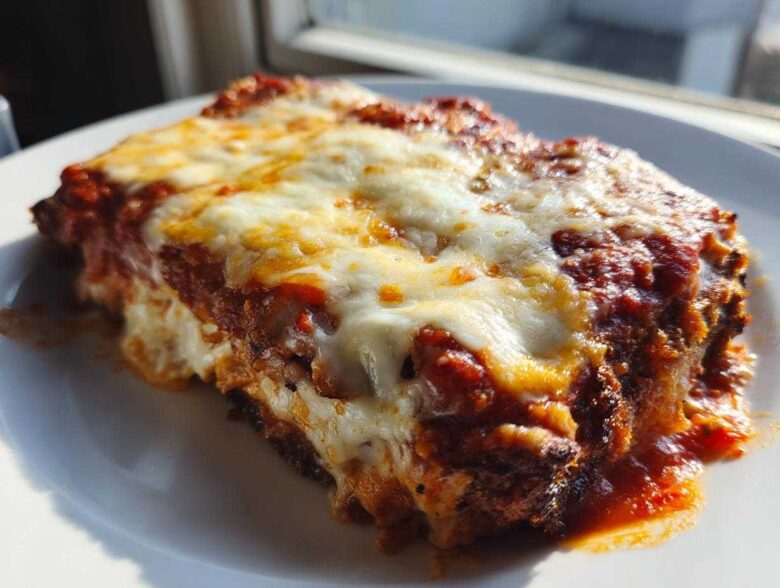
Listen, I know you’ve tried making Chicken Parmesan at home only to end up with sad, soggy chicken drowning under lukewarm cheese. Been there, totally failed there! After years, and I mean *years*, of testing breading ratios down to the last gram, I cracked the code. This isn’t just another weeknight meal; this is my ultimate crispy and cheesy chicken parmesan recipe that truly tastes like you pulled it straight out of that little checkered-tablecloth Italian place downtown. We’re talking crunchy, flavorful cutlets that hold up beautifully to the sauce. You can see a little more about my kitchen philosophy over at my main page! Trust me when I say that once you master this coating technique, you’ll never look back!
Why This Is The Best Chicken Parmesan Recipe
What makes this recipe stand out from all the others? Simple: texture and flexibility. Everyone wants Restaurant Quality Chicken Parm, right? Well, we deliver that crunch factor you crave. This version is the Best Crispy Chicken Parmesan you’ll make because it uses a specific Panko-Parmesan ratio that locks in the crunch. Plus, whether you have time to pan-fry or need a faster, lighter option, this cutlet handles both beautifully. It’s Italian comfort food that actually works for your busy life!
Achieving That Signature Crispy Texture
The secret weapon here is Panko breadcrumbs—they are lighter and shatter beautifully when cooked. We marry that with a solid double-dredge process. You coat it flour-egg-panko, pressing hard into that crumb mixture. That extra layer means even when the marinara hits it later, the initial structure stays firm. It’s the trick to avoiding that dreaded soggy bottom layer!
Quick Italian Dinner Ideas for Weeknights
Don’t let the restaurant-quality feel fool you; this is faster than ordering takeout! The entire process, from pounding the chicken to the final cheese melt, usually clocks in around 35 minutes total. That means this incredibly satisfying chicken parmesan recipe is perfect for when you need Quick Italian Dinner Ideas but refuse to compromise on flavor or texture. Dinner solved!
Ingredients for Your Ultimate Chicken Parmesan Recipe
When tackling something classic like this, you can’t just toss things in—precision matters! I learned this the hard way when my first batch turned out thin and lackluster. For this chicken parmesan recipe to shine, you need quality ingredients ready to go before you even touch the chicken. Below is everything I grab before setting up my breading station. Remember, those chicken breasts need to be pounded evenly; think about 1/2-inch thickness across the whole piece for consistent cooking. It’s worth the effort, I promise!
- 4 boneless, skinless chicken breasts (about 6 oz each—aim for uniformity!)
- 1 cup all-purpose flour (for the first dredge)
- 2 large eggs, beaten well (make sure they’re whisked nicely)
- 1 1/2 cups panko breadcrumbs (the secret to the crunch, don’t sub regular ones!)
- 1/2 cup grated Parmesan cheese (this goes into the breading mix)
- 1 teaspoon dried oregano (the classic Italian background note)
- 1/2 teaspoon garlic powder (not garlic salt, please!)
- Salt and black pepper to taste (season those cutlets generously!)
- 1/4 cup olive oil (for perfectly golden pan-frying)
- 2 cups quality marinara sauce (seriously, get the good stuff; it’s worth it)
- 8 ounces fresh mozzarella cheese, sliced thick (we want that melty pull!)
- 1/4 cup grated Parmesan cheese (this is for the topping)
- Fresh basil leaves, chopped (for that final pop of color and freshness)
How to Make Perfect Chicken Parmesan: Step-by-Step Instructions
Okay, this is where the magic happens! Learning How to Make Perfect Chicken Parmesan isn’t about having a fancy oven; it’s about mastering the prep. When you pay attention to pounding and coating your Chicken Cutlet Parmesan just right, the rest takes care of itself. I usually put on some good music while I pound the chicken because the first step requires a little elbow grease, but stick with me—that even thickness is absolutely crucial for getting the edges cooked at the same time as the center. Follow these exact steps, and you’ll be amazed at the results!
Preparing and Breading the Chicken Cutlets
First things first: the pounding. You need to get those thick breasts down to about a half-inch thickness evenly across the entire cutlet. Use plastic wrap on both sides so the mallet doesn’t tear up the meat. Season them lightly with salt and pepper right away. Now, set up your dredging station: one plate with flour, one bowl with the eggs, and the third plate with your panko mix. Dredge them in order—flour first (shake off the excess!), then the egg bath, and finally really press that panko mixture onto the meat. I mean press it firmly! That ensures maximum coverage. Don’t rush this part!
Pan Fried Crispy Chicken Cooking Method
For that true Italian-American flavor, we are pan-frying. Heat up your olive oil in a large skillet over medium-high heat. You’ll know the oil is ready when it starts to shimmer a little bit—don’t let it smoke! Gently lay two cutlets into the hot oil; we don’t want to overcrowd the pan, or the temperature will drop, and we’ll get soggy chicken. Cook each side for about three to four minutes until it hits a gorgeous golden brown. Once they look perfect and cooked through (remember, the internal temp should hit 165°F), pull them out immediately and place them on a wire cooling rack. Seriously, use a rack, not paper towels, to let the bottom breathe and keep that beautiful crust crispy!
Adapting the Chicken Parmesan Recipe for Baking (No Fry Baked Chicken Parmesan)
I totally get it—sometimes you want that incredible flavor of our Chicken Parmesan recipe without heating up the oil or dealing with the splatter. That’s why I pulled together the steps for a truly fantastic No Fry Baked Chicken Parmesan! This method gives you a surprisingly crispy coating using the oven, keeping it a fantastic Healthy Chicken Parmesan Recipe option for busy nights. You still get that satisfying crunch, just a little lighter overall, which is perfect when you are watching your intake.
You’ll want to preheat your oven to a hot 400°F (200°C). Make sure you lightly spray your baking sheet since oil content is lower here. After breading the cutlets exactly as we did before—that Panko crust is non-negotiable!—lay them out flat. You bake these beauties for about 15 minutes, flip them over carefully, and give them another 5 to 7 minutes until they are cooked through. That’s it! They are ready for saucing and melting that cheese cap.
Air Fryer Chicken Parmesan Quick Option
If you have an air fryer, it’s even better for maintaining crispness with almost no added fat! Think of this as the ultimate Air Fryer Chicken Parmesan hack for speed. Once the cutlets are breaded, spray them lightly with cooking spray. Pop them into the air fryer basket (don’t overload it!) and cook them at 380°F for about 10 to 12 minutes total. You must remember to flip them halfway through! Once they are golden, transfer them to a small baking dish, top with sauce and cheese, and slip them under the broiler for just a minute or two to melt everything perfectly. Always check the kitchen disclaimer before trying out new cooking methods!
Assembling and Baking Your Cheesy Chicken Breast Dinner
This is my favorite part! The chicken is cooked, it’s crispy, and now we turn it into true Italian royalty. Whether you pan-fried them until golden or baked them for a lighter touch, arrange those cutlets snugly in your baking dish. Don’t leave any gaps; we want them touching for stability!
Next, grab your top-quality marinara sauce—remember, the sauce is a huge player here! Spoon a generous layer over the top of each piece of chicken. You don’t want to drown it, but we need enough sauce to soak into the crust slightly while baking. Then comes the real showstopper: the mozzarella! Layer those fresh slices right over the sauce. And for the final touch, a good sprinkle of that remaining grated Parmesan cheese over everything. This creates that amazing crust, making this the perfect Melty Cheese Chicken Bake experience.
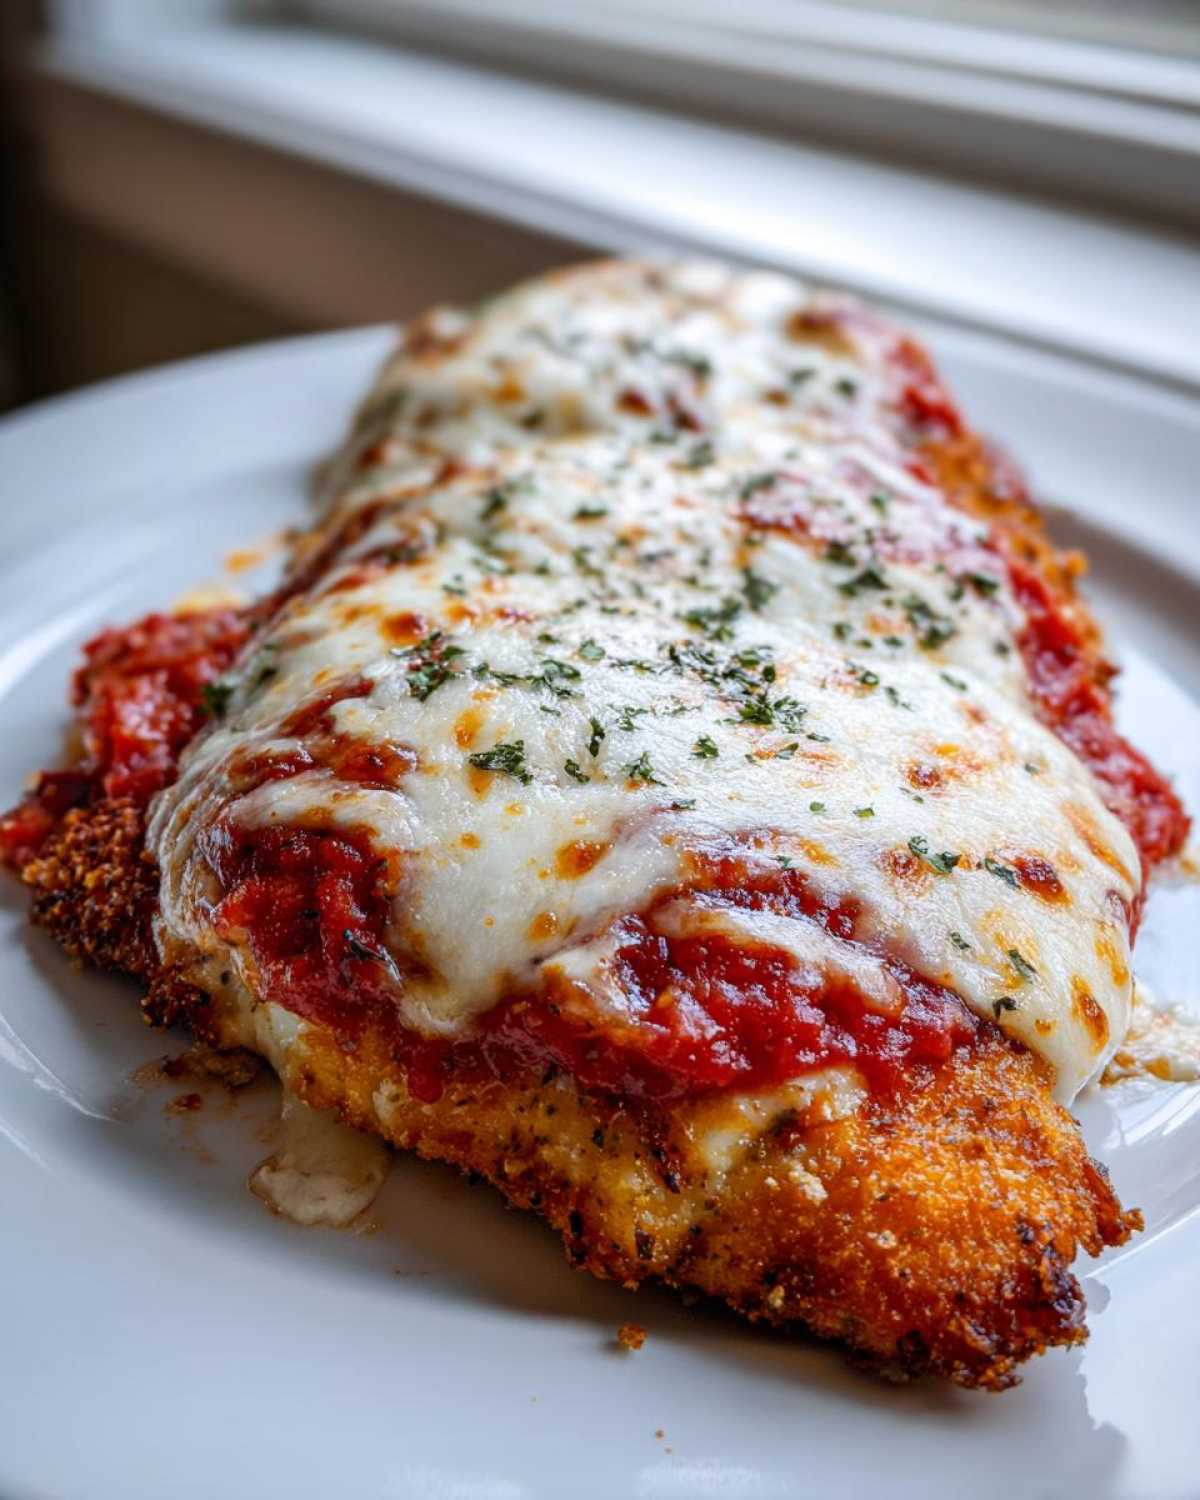
Pop the whole dish into the oven—it’s already hot from the pre-bake step, which is convenient! You only need about five to seven minutes now. We aren’t cooking the chicken anymore; we’re just waiting for that mozzarella to melt into gooey perfection and start bubbling slightly up the sides. If you have a high broiler, go ahead and flash it under there for just a minute to get those cheese edges nicely browned, but watch it like a hawk so it doesn’t burn!
Tips for Success with Your Chicken Parmesan Recipe
Even with the best recipe, sometimes things go sideways, right? I want your Homemade Chicken Parm Tutorial experience to be seamless, so here are the few extra things I always double-check before serving. These little tweaks are what separate a good chicken parm from the legendary one that people keep asking for year after year. Pay attention to these details, and you really can avoid the sogginess trap!
First piece of advice: don’t skip draining the cooked cutlets on that wire rack after frying! If you put them on paper towels, the steam gets trapped underneath, and you’ve just steamed the bottom of your beautiful crust. A rack lets the air circulate completely, keeping that Panko shell rock solid.
My second big tip is about the sauce. Since we cook the chicken *before* adding the sauce, you don’t need tons of it! Over-saucing is another way to guarantee a soggy dinner. Just a good spoonful per cutlet is plenty before you cap it with cheese. And always, always use fresh basil garnish right at the end; it brightens up the whole rich flavor profile.
Finally, if you’re worried about uneven cooking—especially with thicker breasts—stick a meat thermometer in there! Stopping at 165°F before you sauce it means you won’t overcook it waiting for the cheese to melt. You can always reach out if you have trouble by visiting my contact page!
Serving Suggestions for Italian Comfort Food Classics
You’ve nailed the perfect, cheesy cutlet—now, what goes on the plate next? Chicken Parmesan is the star, but it needs an entourage, right? This dish is pure, hearty Italian comfort food, so we typically serve it with beloved, simple pairings that soak up any extra sauce or cheese.
The absolute classic partner is pasta, of course! Spaghetti or linguine tossed lightly in a bit of olive oil and garlic is my go-to; just enough pasta to catch the juices without overpowering the chicken. If you want something a bit chunkier, penne works wonderfully too!
And you absolutely cannot forget the bread for dipping. A thick slice of toasted garlic bread is mandatory for wiping that plate clean—it’s practically a rule in my house! For something lighter to balance all that rich cheese and crunchy frying, a simple green salad dressed with a bright Italian vinaigrette cuts beautifully through the richness. Done! That’s a full, fantastic meal ready in under 40 minutes!
Storage and Reheating Instructions
So, you have leftovers! Isn’t that the best? Having leftover Chicken Parmesan means you have an amazing, fast lunch or dinner waiting for you tomorrow. But we have to talk about storage because no one likes sad, soggy cheese on day two. If you’re storing these beauties, the key is to keep the moisture away from that beautiful, crispy crust we worked so hard to create.
First, you have to cool the dish down first. If you try to cover hot chicken parmesan, you trap all that steam, and that’s a recipe for disaster come morning. Let the dish chill down to room temperature for about an hour. Then, cover the baking dish tightly with plastic wrap, or, if you want to be extra careful, transfer the individual cutlets to an airtight container. It will keep perfectly well in the fridge for three, maybe four days max. Don’t leave it for a week; chicken isn’t like that sauce, unfortunately!
Now for the important part: reheating! This is where we bring back the crunch. You absolutely cannot microwave this if you care about texture. Microwaving heats the moisture in the sauce and steam gets trapped, turning that lovely panko coating into mush instantly. Yuck!
The best method, hands down, is getting it back into the oven or using a toaster oven. Set your oven to about 350°F (175°C). Place the cutlets right on a wire rack set over a baking sheet—yes, use the rack again! This lets air circulate underneath while the oven heats everything up evenly. Heat them for about 10 to 15 minutes, or until the cheese is gooey again and the chicken is heated through. If you’re in a huge rush, a toaster oven works even faster, usually needing just 5 to 8 minutes on the same setting. You’ll be shocked how close this gets you back to that perfect, fresh-from-the-pan texture. Enjoy those leftovers!
Frequently Asked Questions About This Dish
I get so many questions flooding in after people try this recipe for the first time, which I love! It just shows how many people are searching for the Best Crispy Chicken Parmesan out there. Here are the top things people ask when they are making their own Homemade Chicken Parm Tutorial. Don’t worry if you have questions; we’ve all been there when perfecting a classic!
Can I make the breaded cutlets ahead of time?
Yes, you totally can! This is one of my favorite tricks for an even faster weeknight meal. You can prepare the cutlets all the way through the breading stage—flour, egg, panko, pressed firmly—and place them in a single layer on that wire rack (I always use the rack, even for storage prep!) set on a baking sheet. Cover them loosely with plastic wrap and pop them into the fridge for up to 24 hours. When you’re ready to cook, you can pan-fry them straight from the fridge, though you might add an extra minute or two to the cooking time to ensure they reach 165°F internally before saucing. Just don’t let them sit breaded for days, or the moisture transfer starts!
What is the best cheese substitute for mozzarella?
Fresh mozzarella is king for that beautiful, stringy melt, but if you can’t find good quality fresh logs where you are, or if you are trying to keep liquids down, you can certainly substitute! I find that using a mix works best. Try combining half low-moisture, part-skim mozzarella (the stuff that comes pre-shredded often works fine here) with about a quarter amount of good melting provolone. Provolone adds a little extra sharpness that I adore. You still want a good layer of the topping Parmesan over that mix, though; that adds the salty, browned texture we love!
Is this recipe suitable for a 30 Minute Chicken Dinner?
It borders on it! When I list the total time as 35 minutes, that’s based on *my* efficiency, but it’s close enough for me to include it in the realm of Easy Weeknight Chicken Parmesan. If you are lightning fast at pounding and setting up your station, you can absolutely have this on the table in 30 minutes, especially if you use the faster pan-fried method rather than the baked one which takes slightly longer overall. If you’re aiming for a true 30 Minute Chicken Dinner, have your sauce heated up on the stove while you are breading the last piece of chicken. It helps speed up that final melt!
Nutritional Snapshot of This Meal
Now, I’m not a nutritionist—I’m just a home cook who loves a good, hearty meal! So, take these numbers with a grain of salt because every single brand of marinara and every thickness of chicken breast can change things up. But for those of you who like to keep track, I ran the numbers on the standard pan-fried version of this chicken parmesan recipe to give you a general idea of what you’re looking at per serving (that’s one cutlet).
As you can see, it’s a powerhouse meal, heavy on the protein thanks to all that chicken breast! We’ve definitely got some fat in there because we used olive oil for that beautiful fry, but we are keeping the sugar lower than you might expect in a cheesy Italian dinner. These are just good estimates, of course, and you might find your counts vary depending on how heavy-handed you are with the mozzarella!
- Serving Size: 1 cutlet
- Calories: 550
- Protein: 45g
- Fat: 30g
- Saturated Fat: 12g
- Carbohydrates: 35g
- Fiber: 3g
- Sugar: 8g
- Sodium: 750mg
If you’re concerned about sodium, remember that store-bought marinara sauce is often the biggest culprit! Try making your own sauce; it cuts the salt dramatically. Please always review my full privacy policy if you have any questions about how I handle site data!
Share Your Family Favorite Chicken Dishes
Whew! We made it to the end of the ultimate chicken parmesan recipe guide! Seriously, I hope you’re feeling inspired to get those cutlets pounding and that cheese melting. This is one of those Italian Comfort Food Classics that just tastes better when you know you made it yourself.
Now that you’ve tried this recipe, I desperately want to hear about it! Did you stick to the pan-fried gold standard, or did you try the lighter, No Fry Baked Chicken Parmesan route? Or maybe you are one of the air fryer heroes!
Please tell me how it went! Drop a rating below using the five-star system—it really helps other home cooks know they are in the right place for the Best Crispy Chicken Parmesan. I read every single comment, and answering your questions about making this your own Family Favorite Chicken Dishes is the highlight of my week. Don’t forget to share your masterpiece pictures on social media and tag me! Happy cooking, and remember to check out the site’s terms and conditions for all site-related details!
PrintUltimate Crispy Classic Chicken Parmesan
Make restaurant-quality Chicken Parmesan at home. This recipe focuses on achieving a very crispy breading, pan-fried or baked, topped with marinara sauce and melted cheese.
- Prep Time: 15 min
- Cook Time: 20 min
- Total Time: 35 min
- Yield: 4 servings
- Category: Dinner
- Method: Pan-Frying/Baking
- Cuisine: Italian American
- Diet: Meat
Ingredients
- 4 boneless, skinless chicken breasts (about 6 oz each)
- 1 cup all-purpose flour
- 2 large eggs, beaten
- 1 1/2 cups panko breadcrumbs
- 1/2 cup grated Parmesan cheese (for breading)
- 1 teaspoon dried oregano
- 1/2 teaspoon garlic powder
- Salt and black pepper to taste
- 1/4 cup olive oil (for pan-frying)
- 2 cups quality marinara sauce
- 8 ounces fresh mozzarella cheese, sliced
- 1/4 cup grated Parmesan cheese (for topping)
- Fresh basil leaves, chopped (for garnish)
Instructions
- Prepare the chicken: Place each chicken breast between two sheets of plastic wrap. Pound them to an even 1/2-inch thickness using a meat mallet. Season both sides lightly with salt and pepper.
- Set up the breading station: Place flour on one shallow plate. Whisk eggs in a second shallow bowl. Mix panko breadcrumbs, 1/2 cup grated Parmesan, oregano, and garlic powder on a third shallow plate.
- Dredge the chicken: Coat each cutlet first in flour, shaking off excess. Dip into the egg mixture, letting excess drip off. Press firmly into the panko mixture to coat both sides completely.
- Cook the chicken (Pan-Fry Method): Heat olive oil in a large skillet over medium-high heat. When the oil shimmers, carefully place two cutlets in the pan. Cook for 3 to 4 minutes per side until golden brown and cooked through (internal temperature 165°F). Remove and drain on a wire rack. Repeat with remaining cutlets.
- Cook the chicken (Baked Method Alternative): Preheat oven to 400°F (200°C). Lightly spray a baking sheet with cooking spray. Place breaded cutlets on the sheet. Bake for 15 minutes, flip, and bake for another 5 to 7 minutes until cooked through.
- Assemble: Place cooked cutlets in a baking dish. Spoon marinara sauce over each piece. Top generously with mozzarella slices and sprinkle with the remaining 1/4 cup Parmesan cheese.
- Bake until cheese is melted and bubbly, about 5 to 7 minutes. Broil for 1 minute if you want more browning on the cheese.
- Garnish with fresh basil before serving. Serve immediately, often with pasta or garlic bread.
Notes
- For the crispiest result, use panko breadcrumbs instead of standard breadcrumbs.
- If you prefer an air fryer, cook the breaded cutlets at 380°F for 10 to 12 minutes, flipping halfway, before adding sauce and cheese and baking briefly to melt.
- Use high-quality marinara sauce; it makes a difference in the final flavor.
Nutrition
- Serving Size: 1 cutlet
- Calories: 550
- Sugar: 8
- Sodium: 750
- Fat: 30
- Saturated Fat: 12
- Unsaturated Fat: 15
- Trans Fat: 0.5
- Carbohydrates: 35
- Fiber: 3
- Protein: 45
- Cholesterol: 150